
This is a brief post on how I solved a problem using the kreuzwerker/docker Terraform provider on a Windows 11 laptop using WSL2 for Docker. I’ve been following an excellent tutorial on Udemy, More than Certified in Terraform, but the examples are presented on a Unix based OS (the tutor uses AWS Cloud9). To follow Read More

How To Create and Publish a NuGet Package
Introduction In this article I will walk through the process for writing and publishing a .NET NuGet package to nuget.org. It can be quite fiddly to work with NuGets so, I’ve created a new project to establish a simple end-to-end approach and will apply lessons learned to my other packages. I have used Microsoft Visual Read More
How to use Docker Compose for WordPress Development
How to setup a simple WordPress development environment using Docker Compose. With detailed explanations and troubleshooting hints.
Tags: Docker, Docker Compose, GitHub, PHP, WordPress, WordPress-Docker
Posted in Docker, WordPress | No Comments »
Posted in Docker, WordPress | No Comments »

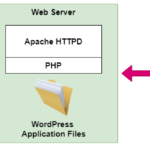
WordPress Development using Docker CLI
How to run development WordPress and MySQL using Docker CLI. An easy guide with troubleshooting tips to:
– create a MySQL database container,
– create a WordPress web server container,
– connect them with a user-defined bridge network,
– persist data in a named Docker volume, and
– attach a host folder to hold the WordPress installation.
Tags: Docker, Docker for Windows, PHP, WordPress, WordPress-Docker
Posted in Docker, WordPress | No Comments »
Posted in Docker, WordPress | No Comments »
Kajabity Tools, Java Properties Updates and Fixes.
I’ve just fixed a couple of bugs raised by users against Kajabity.Tools.Java on GitHub. While I clearly missed the first (raised last December!) the second was the trigger for me to launch into action. Kajabity.Tools.Java provides a C# implementation of standard Java .properties file handling. I released it as an Open Source project and published Read More
Kajabity.DocForms 0.2 Released – Windows Desktop App Framework
Kajabity.DocForms is a simple framework for file based windows desktop applications in .net. The Form, Document and Document Manager classes support creating, loading and saving files with recent file handling, save before closing if modified, drag and drop files and backups. Kajabity.DocForms is Open Source under the Apache 2.0 Licence and is available as Sources and Read More
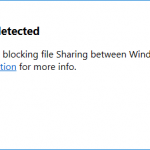
Unblock Docker for Windows Firewall Issues with Host Volumes
Docker for Windows complained it was blocked by my firewall when I tried to map a host directory to a Docker container volume. In this article I’ll describe the steps I tried and what finally worked. To be honest, it’s taken me a while to get around to playing with Docker for Windows again after Read More
Error in Dropwizard Getting Started Sample: WARNING: No injection source found for a parameter of type …
I’m involved in a project that uses Dropwizard so I thought it’s time I had a play with the Dropwizard framework (or whatever it is) so I asked Google for some suggestions (as you do) and it offered me the Getting Started page. A great introduction, but I hit a problem when I tried to Read More
Bluetooth Audio Kept Cutting Out on Samsung S7 (Android) Phone in Car – Fixed
You see, I just wanted to listen to my Podcasts. Well, it actually started with some French Radio podcasts (to improve my speaking and listening before an exchange visit to Angers), but then I got into the Friday Night Comedy from BBC and it snowballed from there. Unfortunately, I had to burn them all to Read More
Kajabity Tools Version 0.4 Released – Strongly Named, Deployed to NuGet.org and GitHub Releases
Kajabity Tools (for C#) is a free, Open Source collection of software utility classes for .NET applications. Version 0.4 introduces some key structural changes, a small number of new features and several bug fixes. Full details are available on the Kajabity Tools pages. This release was prompted by requests, suggestions and contributions from Ivaylo Slavov and Read More
Tags: AppVeyor, C#, CSV, Forms, Java, NuGet, Strongly Named, Windows
Posted in Kajabity Tools | No Comments »
Posted in Kajabity Tools | No Comments »