Introduction
In this article I’ll walk through the setup of a WordPress development environment in Docker containers using Docker Compose.
Using Docker is like having a huge data centre inside your computer. In a previous article, I walked through WordPress Development using Docker CLI, where each of the components (containers, volumes, networks) is added and removed one by one.
Docker Compose, by comparison, describes the complete solution in a single file and uses commands to create, update and destroy it all at once.
There are many different versions of this available across the internet, so I’ve tried to keep this simple, using defaults where possible and providing clear explanations and a little bit of troubleshooting advice.
The code is available on GitHub and includes brief notes and some extra features.
All Docker commands and code will work for both Windows, Mac or Linux, though I’ve used Windows for the examples here.
Install Docker
The only requirement for following along is to install Docker tools – apart from a computer, and a burning desire to use WordPress, of course.
If you don’t already have Docker, visit Get Docker for details on how to install on Windows, Mac and Linux. Docker Desktop is free for personal and smaller business use though there are paid plans for larger organisations.
The Docker installation provides several components including the Docker Engine (which runs Docker containers), the Docker CLI client, Docker Compose and Docker Desktop, etc.
In most cases, you shouldn’t need to mess with the settings.
Now is a good time to check that Docker is installed and running, and which versions are installed:
C:\Users\Simon>docker --version
Docker version 20.10.8, build 3967b7d

C:\Users\Simon>docker-compose --version
docker-compose version 1.29.2, build 5becea4c
You will also need to sign-up for a free Docker Hub account to access the official (and free) WordPress and MySQL Docker Images.
The Plan
I’m told that, as a child I used to love eating tomatoes in my Grandma’s Grocery shop. Sadly, since then I really don’t like the taste of raw tomato – though I still love tomato ketchup or soup!
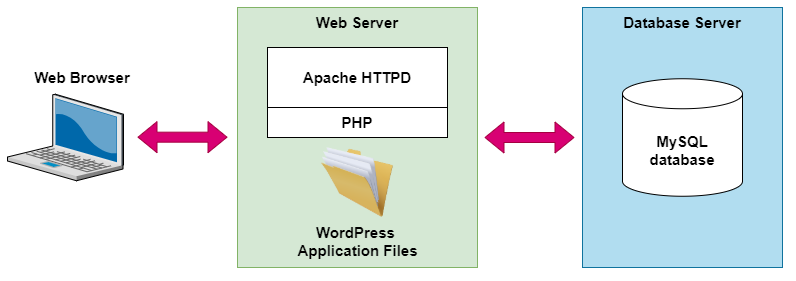
With that in mind, I’ll create an example blog all about tomatoes, “My Tomato Blog”, using Docker Compose to create:
- A WordPress container running Apache HTTPD web server with PHP runtime.
- A MySQL database container.
- Both containers attached to an internal network created by default by Docker Compose.
- An internal data volume to store the database data files.
- A host folder to hold the web site and WordPress application files.
Both the data volume and the contents of the host folder will be populated the first time the containers are started and will remain after they have been removed.
Project Setup
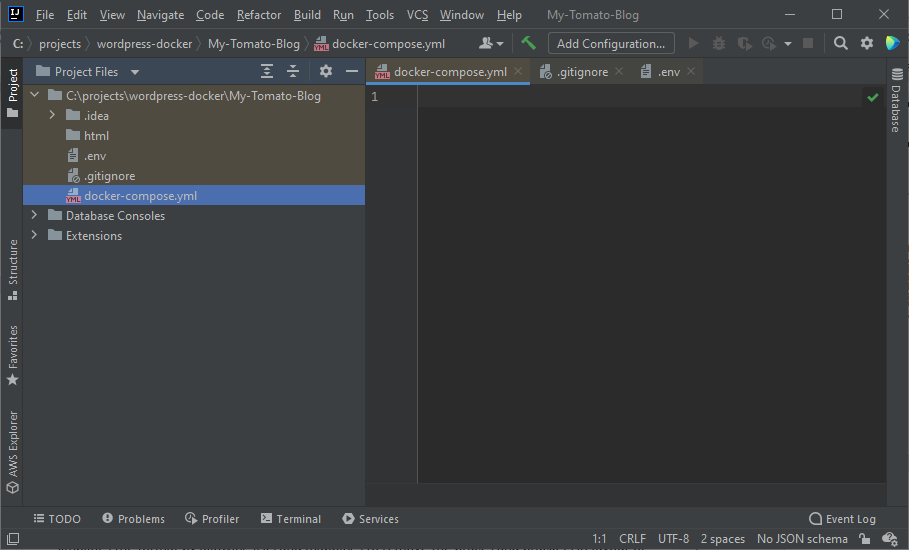
First, I’ve setup a project folder in C:\projects\wordpress-docker\My-Tomato-Blog and added:
- A
htmlfolder that will contain the WordPress files and any other files for the Blog. - A
docker-compose.ymlfile that will container the Docker definitions for the project. - A
.envfile for configuration environment variables such as usernames and passwords. Don’t check this in to source control – it’s where the secrets live! - A
.gitignorefile to make sure I don’t check any secrets or junk into source control.
Here’s a screenshot of the project so far in IntelliJ:
While not strictly necessary for this example, it’s a good idea to start with the .gitignore file first to avoid any embarrassing mistakes later! It can be a real pain if you accidentally check in your password details. This might be a simple example project, but will likely copy it to use for a real project at some point.
Open the .gitignore file and add the following:
.idea/
html/
.env
Here, I have excluded the .env as that’s where I will put any secrets or other localised configuration.
I’ve also excluded the folder created by my IDE, .idea/. There is a very useful GitHub repository containing recommended .gitignore entries for a range of popular scenarios.
Finally, I’ve excluded the html/ folder as its contents aren’t really part of this sample project. Whether or not you include it, or specific subdirectories with the Themes or Plugins you are developing is up to you.
The Docker-Compose File
For this project, I will define all of the components in a single Docker Compose file. By default, Docker Compose looks for a file named docker-compose.yml or docker-compose.yaml (either extension will do) in the current folder.
The contents of the file are in YAML format – an extended form of JSON where you can omit the brackets by using strict indentation instead, as well as a few other tweaks.
Docker Compose looks for a version and up to 5 sections:
- Version – the version of the Docker Compose specification used to construct the file.
- Services
- Volumes
- Configs
- Secrets
- Networks
A template the docker-compose.yml file with all the sections might look like this:
version: '3.9'

services:
  {}

volumes:
  {}

configs:
  {}

secrets:
  {}

networks:
  {}
This is a valid Docker Compose file – though, if you run it, nothing will happen as it doesn’t define any components.
First, notice that each section starts at the very first character position. Indentation matters in a YAML file – lines indented by the same amount belong to the same definition block, until ended by a higher-level block (i.e., with less indentation).
Also, each of the sections is a mapping and, as they are all empty, they are followed by an empty pair of curly braces. The braces are not required once the section has some content.
While you can leave all of the sections in there for reference, I’ve removed the ones I don’t need:
- Since version 3.9, the version is also not necessary and can be omitted. If present, it is only informational.
- Config and secrets are read-only variations of volumes – I’m not using either of them for this project.
- A default network will be created automatically so I’m also not adding anything there.
So, open the empty docker-compose.yml file and add:
services:
  {}

volumes:
  {}
The only required section is services but I’m going to add a data volume next, so I’ve kept that section as well.
Add a Data Volume
A volume, in the Docker sense, is like a shared drive, or network attached storage (NAS). Volumes can be either internal (where the Docker Engine allocates a separate storage area internally) or external (where the volume is mapped to an external storage location such as a folder on the host computer disk).
For this project, I create a single internal volume named data to store the MySQL database data files. If I didn’t, a random volume will be created each time the database container is started and I’d end up with several orphaned volumes cluttering up Docker.
There are many ways to configure and control internal volumes, but for this project, it’s enough to simply name it.
In the docker-compose.yml file, update the volumes section to be:
volumes:
  data:
Notice that the braces are gone (the section isn’t empty now) and the volume name is indented one level (I’m using 2 spaces in this project).
Test the Volume
While it’s not particularly useful so far, you could test the file – it may highlight any mistakes so far.
So, in the project folder use the docker-compose up command:
C:\projects\wordpress-docker\My-Tomato-Blog>docker-compose up
Attaching to
The command looks for a docker-compose.yml (or .yaml) file in the same directory and attempts to start any services defined in it. It then attempts to attach to the output (logs) of one of them… but there isn’t one.
You can check to see if there are any containers running using the docker ps command:
C:\projects\wordpress-docker\My-Tomato-Blog>docker ps
CONTAINER ID   IMAGE     COMMAND   CREATED   STATUS    PORTS     NAMES
Nothing to see here…
You could also have a look at the volume created using docker volume ls:
C:\projects\wordpress-docker\My-Tomato-Blog>docker volume ls
DRIVER    VOLUME NAME
local     e92b5bc39d4a528af0b6b47d72660d61966122080ffa1d5d85237cd69735b3db
local     ed5420d20f679c03f050d07b07d85f0e2fb54ecf6288d786c7296244e6ab0f6b
local     my-tomato-blog_data

C:\projects\wordpress-docker\My-Tomato-Blog>
There are a couple of things to notice. First, the data volume has been created – but it’s named my-tomato-blog_data. This is because Docker Compose automatically adds a namespace to the components it creates – which defaults to the name of the folder containing the docker-compose.yml file.
Secondly, the other two volumes with long random alphanumeric names are the result of starting containers without attaching anything to their exposed volumes.
I could attach them to another container as a volume… but I have no idea what’s in them, so I’ll just remove them instead:
C:\projects\wordpress-docker\My-Tomato-Blog>docker volume rm e92b5bc39d4a528af0b6b47d72660d61966122080ffa1d5d85237cd69735b3db ed5420d20f679c03f050d07b07d85f0e2fb54ecf6288d786c7296244e6ab0f6b
e92b5bc39d4a528af0b6b47d72660d61966122080ffa1d5d85237cd69735b3db
ed5420d20f679c03f050d07b07d85f0e2fb54ecf6288d786c7296244e6ab0f6b

C:\projects\wordpress-docker\My-Tomato-Blog>
You can add multiple volume names to the docker volume rm command.
Shh! Secrets
The next task is to add any secrets and other local configuration items to the .env file so there is no temptation to include them in files that will be committed to source control.
Docker Compose will automatically load a file named .env if found in the same directory to define environment variables within the scope of the docker-compose.yml file (but not the containers created).
For a more detailed description see Environment variables in Compose.
I have included .env-sample in the GitHub version to use as a template – you can simply copy the file to .env and add values as appropriate.
Otherwise, open .env and add:
# MySQL database settings
DB_ROOT_PWD=verySecret
DB_NAME=wp_data
DB_USER=wp_user
DB_PWD=Beefsteak
DB_PREFIX=tomato_

# WordPress content location on local disk
WP_CONTENT=C:\projects\wordpress-docker\My-Tomato-Blog\html
The first entry is a password for the root user in the MySQL Database container.
Next, the name of a new database schema to be added to MySQL which WordPress will use to store content and configuration.
Then a new database user and password that WordPress will use to log into MySQL.
The last database variable is the table prefix – WordPress will use this to prefix any tables it creates to allow multiple WordPress instances to share the same database schema.
Finally, I’ve added the path to the html folder where the WordPress container is going to put application files.
Create a MySQL Database Container
It’s now time to add the first Docker service – a MySQL database.
It’s worth noting that it’s a service rather than a container. Some tools, such as Docker Swarm, can use the docker-compose.yml file to start a set of services, each of which can scale to one or more containers each with the same configuration. Docker Compose will only start a single container for each service.
Open docker-compose.yml and replace the services section with:
services:
  db:
    image: mysql:5.7
    environment:
      - MYSQL_ROOT_PASSWORD=${DB_ROOT_PWD}
      - MYSQL_DATABASE=${DB_NAME}
      - MYSQL_USER=${DB_USER}
      - MYSQL_PASSWORD=${DB_PWD}
    volumes:
      - data:/var/lib/mysql
    ports:
      - '3306:3306'
There’s a lot going on here.
I’ve added a service, called db. It’s a short, simple name, but remember that Docker Compose will add a namespace when the service is started.
The container created for the service will use the official MySQL v5.7 image from Docker Hub.
I’ve provided environment variables to the container with the root user password, database name and database username and password – passing the values from the .env file.
The data volume already added and tested above (but lower down the file) will be mapped to the path where MySQL stores data files.
Finally, the default MySQL database port is mapped onto the same host computer port so that you can use database tools and IDEs to access the database.
Test the Database Container
Now the database definition can be tested.
As before, using a command prompt in the same folder start the database using docker-compose up:
C:\projects\wordpress-docker\My-Tomato-Blog>docker-compose up
Creating network "my-tomato-blog_default" with the default driver
Creating my-tomato-blog_db_1 ... done
Attaching to my-tomato-blog_db_1
db_1  | 2021-09-15 21:14:32+00:00 [Note] [Entrypoint]: Entrypoint script for MySQL Server 5.7.35-1debian10 started.
db_1  | 2021-09-15 21:14:33+00:00 [Note] [Entrypoint]: Switching to dedicated user 'mysql'
...
-- extra lines removed --
...
db_1  | 2021-09-15T21:14:34.358881Z 0 [Warning] Insecure configuration for --pid-file: Location '/var/run/mysqld' in the path is accessible to all OS users. Consider choosing a different directory.
db_1  | 2021-09-15T21:14:34.559859Z 0 [Note] Event Scheduler: Loaded 0 events
db_1  | 2021-09-15T21:14:34.560305Z 0 [Note] mysqld: ready for connections.
db_1  | Version: '5.7.35'  socket: '/var/run/mysqld/mysqld.sock'  port: 3306  MySQL Community Server (GPL)
There are several things to notice:
- If this is the first time you have used the MySQL image it will be pulled from Docker Hub. As I’ve already used it many times (not least while testing the code for this article) I already have it cached locally by Docker.
- A new, default network has been created named
my-tomato-blog_default. The containers created will be attached to this network. - A MySQL database container has been started, this is named
my-tomato-blog_db_1as it’s the first (and only) container for the service. - The
Attaching tomessage is there again – but this time it’s been able to attach to the new dB container and output the logs on the command line. - There is then a lot of junk in the logs (I’ve removed most of it).
- Finally, you see the message
mysqld: ready for connections.
At this point, you can connect to the database using any MySQL client such as MySQL Workbench (https://www.mysql.com/products/workbench/) or an IDE with database features. The hostname is localhost, and use either the root or wp_user username and password set above.
When you’re happy, use Ctrl-C to stop the container and regain your command line. The container will be gracefully stopped – but not deleted. The volume and network are also still there. You can check with docker network ls and docker volume ls.
...
Gracefully stopping... (press Ctrl+C again to force)
Stopping my-tomato-blog_db_1 ... done

C:\projects\wordpress-docker\My-Tomato-Blog>docker network ls
NETWORK ID     NAME                     DRIVER    SCOPE
b1b3bf8b34cf   bridge                   bridge    local
44f22fd370f9   host                     host      local
c9e3e7f71414   my-tomato-blog_default   bridge    local
f073bb80b876   none                     null      local

C:\projects\wordpress-docker\My-Tomato-Blog>docker volume ls
DRIVER    VOLUME NAME
local     my-tomato-blog_data

C:\projects\wordpress-docker\My-Tomato-Blog>
Create a WordPress Container
The final component to add is the WordPress container. I’ve used the official WordPress image from Docker Hub which has an Apache HTTP web server with a PHP runtime installed.
When the container starts, it will look for an installed copy of WordPress in the web server content directory and, if missing, install a new one.
So, in docker-compose.yml append the web service to the services section:
web:
  image: wordpress:latest
  environment:
    - WORDPRESS_DB_HOST=db
    - WORDPRESS_DB_NAME=${DB_NAME}
    - WORDPRESS_DB_USER=${DB_USER}
    - WORDPRESS_DB_PASSWORD=${DB_PWD}
    - WORDPRESS_TABLE_PREFIX=${DB_PREFIX}
  volumes:
    - ${WP_CONTENT}:/var/www/html
  ports:
    - '8080:80'
Note that web should be indented the same as db.
The web service will create containers using the latest version of the official wordpress image.
I use environment variables to pass in the database hostname (which is the db service defined above) and provide the same database schema name and database username and password as provided to the MySQL container above it.
I’ve also passed in the table prefix that WordPress should use to name its tables.
I’ve mapped the Apache web server content folder to the html folder created in the project so that I can view and edit the WordPress and other web site files – once the container has installed them.
Finally, Apache HTTPD web server uses default HTTP port 80 but I’ve mapped it to port 8080 on my computer so it doesn’t clash with any existing web server.
That’s all of the code written – it much took longer to explain than to write it!
Ready to Test
Wait, wait, wait! I don’t want all of that logging junk on my command line every time I run the containers. Instead, I’ll use the --detached (or -d) command line option to run the containers in the background and give me back the command prompt.
So, use docker-compose up -d to start the containers:
C:\projects\wordpress-docker\My-Tomato-Blog>docker-compose up -d
Starting my-tomato-blog_db_1  ... done
Creating my-tomato-blog_web_1 ... done

C:\projects\wordpress-docker\My-Tomato-Blog>
As soon as the command prompt is returned you can check that the containers are running:
C:\projects\wordpress-docker\My-Tomato-Blog>docker ps
CONTAINER ID   IMAGE       COMMAND                  CREATED             STATUS          PORTS                                                  NAMES
32a8832a313b   wordpress   "docker-entrypoint.s…"   18 seconds ago      Up 12 seconds   0.0.0.0:8080->80/tcp, :::8080->80/tcp                  my-tomato-blog_web_1
7522b9ad27d3   mysql:5.7   "docker-entrypoint.s…"   About an hour ago   Up 15 seconds   0.0.0.0:3306->3306/tcp, :::3306->3306/tcp, 33060/tcp   my-tomato-blog_db_1

C:\projects\wordpress-docker\My-Tomato-Blog>
You will also find that a copy of the WordPress application has been installed in the html folder:
C:\projects\wordpress-docker\My-Tomato-Blog>dir html
 Volume in drive C has no label.
 Volume Serial Number is 842B-7059

 Directory of C:\projects\wordpress-docker\My-Tomato-Blog\html

15/09/2021  23:32    <DIR>          .
15/09/2021  23:32    <DIR>          ..
18/08/2021  23:22               261 .htaccess
06/02/2020  07:33               405 index.php
01/01/2021  01:19            19,915 license.txt
06/07/2021  13:23             7,346 readme.html
21/01/2021  02:37             7,165 wp-activate.php
20/07/2021  17:22    <DIR>          wp-admin
06/02/2020  07:33               351 wp-blog-header.php
17/02/2021  14:08             2,328 wp-comments-post.php
18/08/2021  23:21             5,456 wp-config-docker.php
21/05/2021  11:40             3,004 wp-config-sample.php
15/09/2021  23:32             5,560 wp-config.php
20/07/2021  17:22    <DIR>          wp-content
30/07/2020  20:14             3,939 wp-cron.php
20/07/2021  17:22    <DIR>          wp-includes
06/02/2020  07:33             2,496 wp-links-opml.php
15/05/2021  18:38             3,900 wp-load.php
06/04/2021  19:39            45,463 wp-login.php
14/04/2020  12:32             8,509 wp-mail.php
02/06/2021  00:09            22,297 wp-settings.php
07/05/2021  21:16            31,693 wp-signup.php
08/10/2020  22:15             4,747 wp-trackback.php
08/06/2020  20:55             3,236 xmlrpc.php
              19 File(s)        178,071 bytes
               5 Dir(s)  667,429,568,512 bytes free

C:\projects\wordpress-docker\My-Tomato-Blog>
After copying the WordPress files into this folder, the WordPress container also copies wp-config-docker.php to wp-config.php. This version of the WordPress configuration file uses the environment variables passed in from the docker-compose.yml file for the database settings. Any variables not provided are set to default values.
The Famous WordPress 5-Minute Install
You should be able to access the new WordPress blog at http://locahost:8080.
The first page is the start of the famous WordPress 5-minute install:
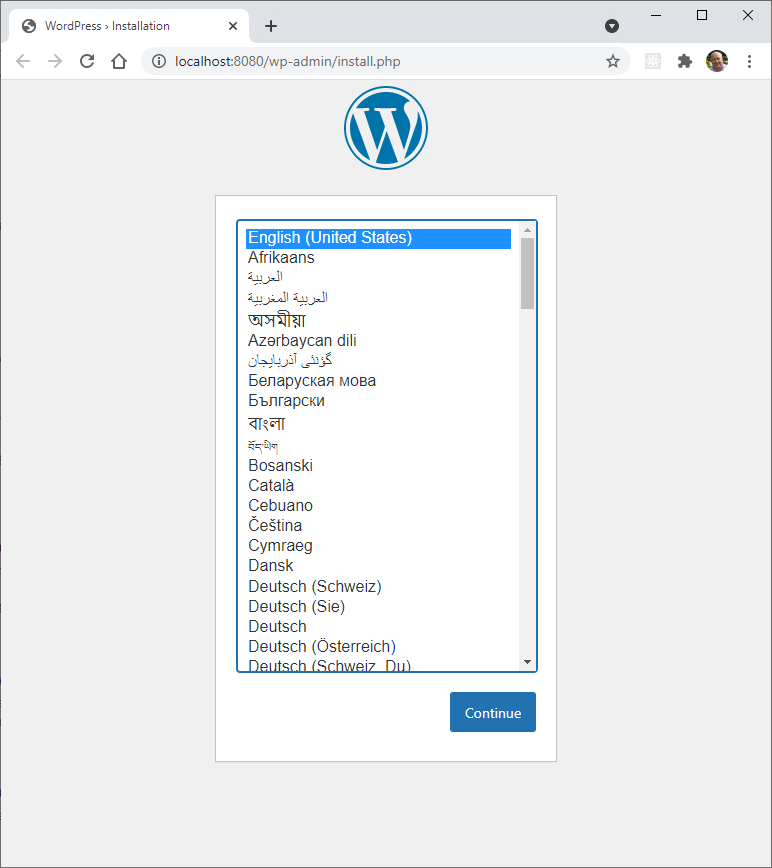
Follow the prompts and you will arrive at the WordPress Dashboard.
I would suggest setting a simple password for development so that you don’t need to remember lots of different ones for each project. Of course, you need to use much more secure passwords for any live sites.
Now you are ready to play with WordPress – or develop themes and plugins.
When You’ve Finished
Once you’ve finished working with WordPress, it is very simple to stop and remove the containers – leaving the MySQL data and WordPress files intact.
Use docker-compose down to stop and remove the containers:
C:\projects\wordpress-docker\My-Tomato-Blog>docker-compose down
Stopping my-tomato-blog_web_1 ... done
Stopping my-tomato-blog_db_1  ... done
Removing my-tomato-blog_web_1 ... done
Removing my-tomato-blog_db_1  ... done
Removing network my-tomato-blog_default

C:\projects\wordpress-docker\My-Tomato-Blog>
Now you can use docker ps -a to show all containers, including stopped ones:
C:\projects\wordpress-docker\My-Tomato-Blog>docker ps -a
CONTAINER ID   IMAGE     COMMAND   CREATED   STATUS    PORTS     NAMES

C:\projects\wordpress-docker\My-Tomato-Blog>
They’ve all gone.
List the Docker networks (docker network ls) to confirm that the network created has now been removed:
C:\projects\wordpress-docker\My-Tomato-Blog>docker network ls
NETWORK ID     NAME      DRIVER    SCOPE
87aa7bd26d39   bridge    bridge    local
44f22fd370f9   host      host      local
f073bb80b876   none      null      local

C:\projects\wordpress-docker\My-Tomato-Blog>
Only the default (bridge, host and null) networks remain.
And finally, using docker volume ls, confirm that the MySQL data volume has been retained – ready to carry on where you left off with you return to the project:
C:\projects\wordpress-docker\My-Tomato-Blog>docker volume ls
DRIVER    VOLUME NAME
local     my-tomato-blog_data

C:\projects\wordpress-docker\My-Tomato-Blog>
You can also have a look at the files in the html folder to see that they are still there.
To restart the containers again, use docker-compose up -d as before.
Troubleshooting
If you have any problems at this point, I’d suggest the following remedies:
- The database may still be starting up – particularly if you didn’t test it earlier. Wait a couple of minutes and try again. You could also have a look at the logs using
docker logs my-tomato-blog_db_1and look for themysqld: ready for connections.message. - Compare the
docker-compose up -dwith the one on GitHub – paying particular attention to the indentation. - Have a look at the Troubleshooting section in WordPress Development using Docker CLI.
Conclusion
That’s it, there’s nothing more you need to do!
Now, go play with WordPress!