In the past, I have found the easiest way to get to grips with a new build tool is to give it a try on a project – new or existing. In this article I will describe how you can test drive Apache Maven by using as a build tool for one of your existing projects – though it’s a little bit like hiring Michelangelo to whitewash your bathroom ceiling.
I’ll begin by adding an Apache Maven project file (called pom.xml) to your existing project base directory. Then we’ll try to solve some of the more common problems that newcomers often encounter. I’ll briefly introduce you to component repositories and the dependency mechanism, though I’ll show more of the power it offers in the next article. Finally, I’ll briefly introduce a few more features and benefits to help you decide if Apache Maven is right for your developments.
On first inspection, Apache Maven looks like an awful lot of fiddly XML to wade through. I want to show you it’s as easy as making a sandwich and it’s just unfamiliarity that makes it seem hard.
And once you have tried it the hard way, you will find excellent IDE support – to do all the hard work for you using the m2eclipse plugin in Eclipse, for example.
Note: Apache Maven runs on Windows, Linux and other Unix and Apple Mac platforms but I’ve used examples from my own Windows environment throughout. Add a comment if you would like equivalent descriptions for any other environments and I’ll respond as soon as I can.
First Steps Before You Begin
There are several things you need to do before you attempt to setup an Apache Maven project. I’ll assume you already have a computer ready and know what Java and XML are ;-).
First, if you haven’t already, you will need to install to a Java JDK, at least version 1.5 – though you can still build java components for older Java versions using Maven. Start here to install Java. You will also need to setup the JAVA_HOME environment variable to point to the JDK – for example:
set JAVA_HOME=C:\Java\jdk1.6.0_20
Note: don’t quote the directory – see here for why.
Obviously, you then need to install Apache Maven – I have used version 2.2.1 for this article. Have a look at my earlier article, Windows Installer for Apache Maven 2, or get it from the Apache Maven downloads page, which also includes installation instructions.
As part of the installation, setup the M2 environment variables and add Maven to the path – for example:
set M2=C:\Java\apache-maven-2.2.1\bin
set M2_HOME=C:\Java\apache-maven-2.2.1
set PATH=%PATH%;%M2%
To see if all these settings are OK, open a Windows command line window and enter the following command:
mvn –version
This will display something similar to the following:
If you see an error, then check the details you have setup so far, fix any problems (add a detailed comment below if you can’t) and try again.
Your Local Repository
The installed part of Apache Maven is only the core, so it will use its powerful dependency mechanism (more on that later) to download a whole host of files which it caches in a local repository. The default location is ${user.home}/.m2/repository. The repository on my Laptop is currently about 1GB after I recently cleared it out – and it could get a lot bigger (which could blow your profile size in a corporate network).
So, if you want to move it you need to create a settings file in ${user.home}/.m2/settings.xml containing the following (put in your own preferred repository location):
Alternatively, you can copy the template settings file from the maven install (%M2_HOME%/conf) and add or change the above localRepository line. See http://maven.apache.org/settings.html for more details.
Finally, Apache Maven is a Java program which needs access to the Internet to download plugins and project dependencies – if you have any problems have a look at http://maven.apache.org/run-maven/index.html.
Selecting a Project to Test
Of course, Maven will work happily with most Java based projects and some non-Java projects, but you can make your life easier by picking the right project to test drive.
One of the benefits of using Apache Maven is that it makes it easy to break an application into many smaller components, to bring in third party components and to share your own components.
However, each of the other components that your selected project depends on needs to be defined in the Maven project file – and must itself be “Mavenised” in one way or another (though there is a short cut for that).
So, ideally select a project with as few dependencies as possible – and particularly avoid depending on any of your in-house projects until they too have been Mavenised.
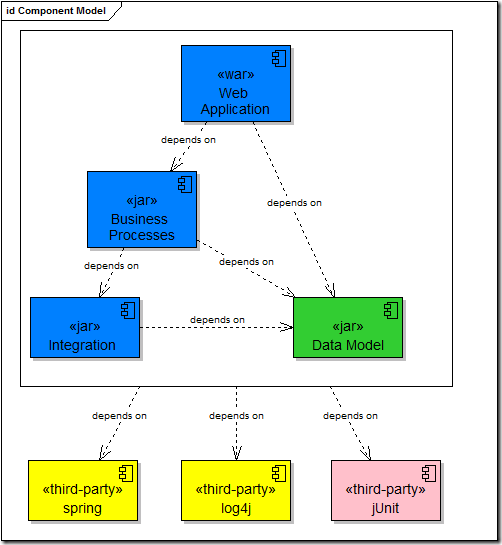
The above component diagram shows typical components for a simple Java Web Application with the WAR (blue)comprising all of the other components. The Business Processes and Integration components (blue) are separated out and all depend on the Data Model (green).
Each of these internal components makes use of third-party spring and log4j components (yellow). Finally, very sensibly, they each use jUnit (pink) for unit testing. These are already available through the Maven dependency mechanism.
In this case, I would recommend the Data Model project as the best one to try.
Another consideration is to avoid projects with complex build requirements – again, you will be able to achieve this with Maven but it’s best to avoid it on the first go. Alternatively, start with the simplified build and add the complexity later as required.
Note: many complex builds can be simplified by refactoring the components and build processes into smaller, simpler projects.
Finally, Maven can build several different types of Java component – .jar, .war, .ear and others. However, all but the .jar will require a number of additional configuration options – all well documented when needed, but more trouble than necessary for the first test run. Stick to a basic “.jar” project this time.
The Maven Project File
After all that, it’s finally time to create your first Maven project file – there’s a lot to do, but it’s all worthwhile and we’ll work through it one step at a time.
Start by copying the following boilerplate code into a file called “pom.xml” in the project’s root directory:
This is the Maven equivalent of the IDE’s project file and defines all the different aspects of the project in a standard way that can be used by many plugins and third party tools. It can also be used to generate project files for several IDEs. This is boilerplate and will form the starting point of every Maven project.
Next is the key task of naming your component. The name consists of a series of values which are used to locate the component in the repository – thus they are called the Maven Coordinates.
For your project you will need to make up values for the following :
Group Id – this tends to be the same as the Java Package base for the project – so for the Kajabity Words web application I will use something like com.kajabity.words. It groups together related components.
Artefact Id – this is the name of the component, so familiar examples are jUnit or spring-core or log4j. For this example I am writing a Word Parser component – so I’ve called it word-parser.
Version – an important requirement for software components is to strictly version them which makes it so much easier for others to re-use the component and to insulate them from on-going changes you make. So you need to specify the current version of the project – or just pick one to start with, say 0.0.1 for a fairly new project, or 1.0.0 if you’ve just released it. BUT – if you are still working on it, you should stick -SNAPSHOT after the version number – which is Maven’s way of saying this is a “Draft” or “Work in Progress” component.
For the Word Parser, here are those last three configuration details (added into the pom.xml at the “Add stuff here…” point):
com.kajabity.wordsword-parser0.0.1-SNAPSHOT
By default, Maven builds and packages projects as a Jar, but it can build other types of artefacts. Though it’s not necessary, we’ll specify the default packaging as well:
jar
For some projects, this might be enough – so let’s try out another command.
Try a Maven Command
Another feature of Maven that I like is that it’s Clean and Tidy. By default, it expects to find all source files in the ./src directory – and everything it produces through the various build processes goes somewhere under the ./target directory. This makes it very easy for it to clean up after itself – it just deletes the ./target directory. Job done.
But, wait – what if your project uses a different output directory? Or if you already have something important in it that you don’t want to lose? You can simply tell Maven to use a different directory by adding the /project/build/directory element after the packaging element – for example ./stuff/other:
stuff/other
Ah, now then, with that done (if necessary) we can try out the Maven “clean” command.
mvn clean
You might need to sit down for this – because if it all went well, the results are likely to be something like the following:
Phew! It looks like half the internet was downloaded! And I’ve cut most of it out…
What happened there is that Maven downloaded the Maven Plugin component which implements the Clean command. It also downloaded any other components that are either specified in the plugin’s own POM or implied by the default configuration.
If you look at the first file that was downloaded you can see both the Maven Central repository (http://repo1.maven.org/maven2/) and the Maven Coordinates of the maven-clean-plugin:
Group Id: org/apache/maven/plugins/
Artefact Id: maven-clean-plugin/
Version: 2.2/
AND the POM describing it: maven-clean-plugin-2.2.pom
The reason it gets the POM first is that it uses this to find out what the plugin component is, see if the maven-clean-plugin itself has any dependencies – and goes to get those as well!
The good news is that it won’t do it next time you run the clean (try it and see). This is because all of the downloaded files have been cached in the local repository (which you may have configured in the settings.xml file) – go and have a look – so they are already there for next time.
And, if you haven’t built anything yet, the target directory (or whatever you configured) isn’t there to be deleted. If it was, it would have been deleted and Maven would have said so – somewhere near the bottom of the output.
Of course, it might not have worked for a variety of reasons:
It couldn’t find the pom.xml file – for example, if you didn’t run it in the project directory.
The pom.xml was invalid – either bad XML format or the wrong elements.
Well, there are still a few more details to consider, so let’s press on. The next few sections describe some of the additional settings you may need to add.
Maven Project Directory Structure – Or Not
Maven, like many build tools, uses the build by convention approach and assumes you have placed all your sources into a standardised directory structure – but you don’t have to.
First, here is a description of some of the commonly used default directories for Maven:
Directory
Description
./
This is the project directory and is where the pom.xml file should be located.
./src
All of the source files should be under this overarching folder.
./src/main
All of the main application sources go under this folder – these are all going to be part of the final application or component.
./src/main/java
The Java source files for the component.
./src/main/resources
Any resources for the component – e.g. properties files – which are copied to the output folder during the build process (depending on the type of project).
./src/test/java
Test Java sources – these are compiled and run as part of the test phase of the build (e.g. jUnit tests) but are not deployed as part of the final application or component. Makes it easy to keep test code out of the live code.
The excerpt below shows how, with some settings in the /project/build element for my test project, I have moved all the source and target directories into a single directory called ./stuff just to show how each of the source and target directories can be re-defined:
Note: if you now run the clean command it will delete all three of the output directories (if they had been created). That came as a nice surprise to me…
This shows that you can fit Maven into any existing project without too much effort. Nevertheless, once I have published this article I will be moving everything back to the much tidier Maven default directory structure!
Repositories
For me, yet another of the great things about Maven is that it encourages componentisation of projects. The easiest way to solve most build problems is to break the project into smaller, better defined components (yes, I know I’m repeating myself).
Better still, as components are first class citizens on Maven, it makes it really easy to link in components from elsewhere – both in-house and third party. And its the same for all Maven projects – including plugins which are themselves Maven projects.
But where do these components come from? A Maven Repository.
Maven components are stored in repositories – they may be Public repositories (such as Maven Central) or your company can setup its own repositories (e.g. using a network drive, or one of the repository mangers, Apache Archiva, Artifactory or Nexus). For a comparison of repository mangers see Maven Repository Manager Feature Matrix.
The diagram above shows the flow of artefacts in and out of repositories:
Components and plugins (JARs, WARs, EARs and their POMs, sources, JavaDoc, etc.) are retrieved from public repositories such as Maven Central.
Or, you can also retrieve components and plugins from an internal repository. These can be your own internally developed components or a managed mirror/proxy for public repositories.
All of these are cached locally by Maven on your hard disk.
Each Maven build will either reference the JARs in the classpath or copy components into the build (e.g. to create a WAR or EAR).
Once you have built your component you can Install it into your local repository.
Finally, either you or your build server will deploy a (hopefully fully tested) component to either your Company repository or even a public repository – so that it is available to be included in other projects – or for download and deployment by test and production teams.
The Maven Coordinates described above define the location in the repository. I have a little project called Word Parser with a groupId of “com.kajabity.words”, an artefactId of “word-parser” and the version is “0.0.1-SNAPSHOT” – so for my local repository (remember the settings.xml file, above) the resultant component (POM, JAR, etc.) will be stored in:
Note: I have added some configuration to the POM to include a Java sources JAR – I could also have included a JavaDoc jar and other artefacts associated with this component. IDE integrations usually allow you automatically attach these sources and docs to the jars in the build path.
Adding Dependencies
The Word Parser project depends on two other open source components – log4j and jUnit (which is only used during testing – that’s important).
So we can add the two dependencies before the build element:
log4jlog4j1.2.17junitjunit4.10jartest
You can see here that we use Maven Coordinates as to identify these dependencies. In addition, the optional type element corresponds to the packaging element mentioned above and again defaults to jar.
In particular, notice the scope element on the jUnit component which identifies it as a test only dependency. This highlights another handy feature of Maven – it clearly separates test classes and resources from live code. Test resources are only included when compiling and executing test code.
But how do you identify the dependency naming details? Well, for many open source projects search for them in Maven Central (http://search.maven.org/) or your internal company repository. Failing that, you can usually find an example by including “maven dependency” in your Google search for the component.
Alternatively, if the component is not already available from an accessible Maven repository, you may need to use one of the following approaches (assuming you already have a copy of the component):
Guess the name values and just add the dependency. When you build it, Maven will tell you it can’t find it and then helpfully provide you with a command to install it to your local cache. Run the command substituting the location of your copy of the component.
Use a system dependency which allows you to add a locally stored component (in a libs directory, for example) and specify the path to it in a system element inside the dependency.
Or, get the component Mavenised as well…
The Build Lifecycle
At this point, you could build your project (watch for all those component downloads the first time…):
mvn install
And this would compile and test your project, package it into a jar and copy (install) it into your local cache repository.
It does this by following the default build lifecycle. This can compile, package, test, install to local repository and deploy your project. So when you tell maven to install the project it will execute all the phases before that and stop at install.
Maven assumes all Java projects are stuck back in version 1.3 – for widest compatibility! Therefore, if your java requires a version of Java newer than 1.3 it might fail to compile. (Still, may be worth a try just to see the errors…)
So we need to tell Maven to use a newer version of Java.
This seems a good point to say more about the way Maven uses plugins. Almost everything Maven does is performed by a plugin – maven comes with a few defaults, but there are many more you can ask it to use either on the command line or by adding their details to the project’s POM. You can also change the configuration used for any of the plugins.
One such plugin is the maven-compile-plugin which is responsible for compiling Java sources. If you wish to change from the default Java 1.3 source and target settings, you can simply add the following inside the /project/build element of the POM:
maven-compiler-plugin1.61.6
Normally, plugins are identified using the same Maven Coordinates as for your components. However, for Maven plugins you can often rely on default Maven values for Group Id (and version, but only for Maven 2.2.1 – not in v3).
Conclusion
I hope this is enough to get you started with Maven. I have rushed you past so many details and ignored its huge number of features and options.
One of my favourite features is the ability to generate detailed and structured project documentation. This is the third built-in Lifecycle and deserves its own set of articles – but you can gain a quick by running the following command:
mvn site
Open up the index.html file in the ./target/site directory. The plugin management page, for example, lists all the currently defined default plugin versions (since we’ve not yet defined our own).
Good luck with Apache Maven – and look out for more articles on it here.
Hi! This is my first visit to your blog! We are a team
of volunteers and starting a new initiative in a community in the same niche.
Your blog provided us useful information to work on.
You have done a marvellous job!


Hi! This is my first visit to your blog! We are a team
of volunteers and starting a new initiative in a community in the same niche.
Your blog provided us useful information to work on.
You have done a marvellous job!
Thanks a lot! very clear explanation..